How to Set Up a Mic – Upgrade Your Audio Today
Many people buy a microphone but feel disappointed after the first recording. The sound may feel too low, full of noise, or not clear enough. This happens when people do not know how to set up a mic correctly. I have worked with different recording tools for years, and I often see the same mistake.
Many users only plug in the mic and start recording without checking the basic settings. A few simple setup steps can turn poor audio into clean and strong sound.
When you learn how to connect a mic to a computer or different devices in the right way, your voice becomes clear and easy to understand for listeners.
How to Connect a Mic Correctly
Connecting a microphone correctly is the first step to getting clear and high-quality sound. The connection method depends on the type of microphone you have. Some microphones connect directly through a USB port, while others need an audio interface or special cable.
Before connecting your mic, check the microphone type and make sure your device has the required port. Follow these steps to connect your microphone properly.
How to Connect a USB Microphone to a Computer
A USB microphone is the easiest type of mic to set up because it connects directly to your computer.
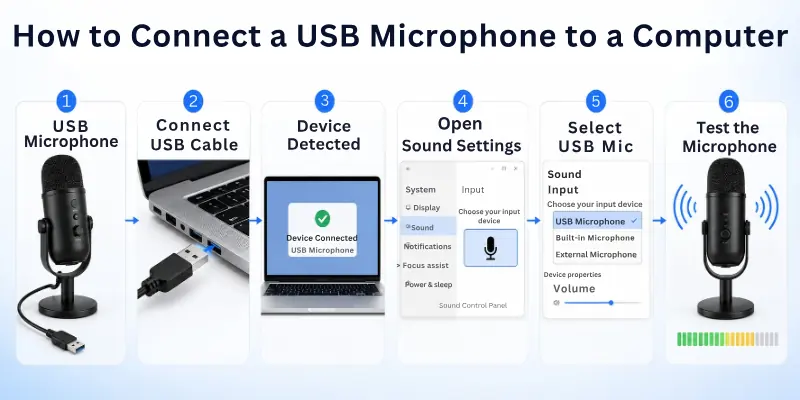
Follow these steps:
- Plug the USB cable into your microphone.
- Connect the other end of the cable to a USB port on your computer.
- Wait a few seconds for your computer to detect the microphone.
- Open your computer’s sound settings.
- Select your USB microphone as the input device.
After selecting the microphone, test it by speaking into it. If the volume level moves, your mic is connected correctly.

How to Connect an XLR Microphone With an Audio Interface
XLR microphones are common for professional recording, podcasts, and music. They do not connect directly to most computers. They need an audio interface to convert the microphone signal into a format your computer can understand.
Follow these steps:
- Connect the XLR cable to your microphone.
- Plug the other end of the XLR cable into the audio interface.
- Connect the audio interface to your computer using a USB cable.
- Turn on the audio interface.
- Enable phantom power if your microphone needs it.
- Select the audio interface as your input device.
Make sure all cables fit tightly. A loose connection can cause noise, low volume, or no sound.
How to Connect a 3.5mm Microphone
Some microphones use a small 3.5mm audio plug. These microphones are common in headsets and older devices.
Follow these steps:
- Find the microphone input port on your computer.
- Insert the microphone plug into the correct port.
- Check your sound settings.
- Select the connected microphone as the input device.
Some laptops combine the headphone and microphone ports into one jack. In this case, you may need a compatible adapter.
How to Connect a Mic to a Laptop
Most laptops support USB microphones and headset microphones. To connect a mic:
- Plug the microphone into the correct port.
- Wait for the laptop to recognize the device.
- Open sound settings.
- Choose your microphone as the input source.
If your laptop does not detect the microphone, try another USB port or check if the microphone works on another device.
How to Connect a Mic to a Phone or Tablet
Many modern smartphones do not have a traditional microphone port. You may need an adapter or a wireless connection.
Steps:
- Check if your microphone supports mobile devices.
- Connect it using the correct adapter or Bluetooth.
- Allow microphone permission when your device asks.
- Select the microphone in the app settings if needed.
Check Your Connection Before Using the Mic
After connecting your microphone, always check these things:
- The cable is connected properly.
- The microphone is not muted.
- The correct input device is selected.
- The microphone volume is at a suitable level.
- Your device recognizes the microphone.
A correct connection helps your microphone deliver clear sound and prevents common problems like low volume, background noise, or no audio.
How to Set Up Your Mic Position for Better Sound
The position of your microphone plays an important role in sound quality. Even a high-quality microphone can produce poor audio if you place it incorrectly. A good position helps your voice sound clear, reduces background noise, and prevents unwanted sounds.
Follow these tips to place your microphone correctly.
Keep the Right Distance From Your Mouth
The distance between your mouth and the microphone affects your voice quality.
- Keep the microphone around 4 to 8 inches away from your mouth for clear sound.
- Avoid placing it too close because your voice may sound too loud or create breathing noises.
- Avoid placing it too far because your voice may sound weak and unclear.
Finding the right distance helps your microphone capture your voice naturally.
Adjust the Microphone Angle
The angle of your microphone also affects how it records your voice.
- Point the microphone toward your mouth.
- Speak into the correct side of the microphone.
- Avoid speaking directly into the top of some microphones because they may not capture sound properly from that angle.
Many microphones have a front side that picks up sound better. Check the microphone design to find the correct speaking area.
Place the Microphone at Mouth Level
Keep your microphone close to your mouth level instead of placing it too high or too low.
A good position helps you:
- Speak comfortably.
- Maintain a consistent voice level.
- Avoid changing your posture while recording.
If you use a desk microphone, adjust the stand height so you do not need to lean forward or move closer while speaking.
Use a Mic Stand or Boom Arm
A microphone stand or boom arm keeps your mic stable and improves your recording quality.
It helps by:
- Reducing vibrations from your desk.
- Keeping the microphone in the same position.
- Making your setup more comfortable.
A boom arm is useful for streamers, podcasters, and people who record videos because it saves desk space.
Use a Pop Filter to Reduce Harsh Sounds
A pop filter is a small accessory that attaches in front of the microphone. It reduces strong air sounds created when you pronounce words with letters like P, B, and T.
A pop filter helps your voice sound smoother and cleaner.
Avoid Noisy Areas
Your microphone can pick up unwanted sounds around you. Place your microphone away from:
- Fans
- Air conditioners
- Loud computers
- Open windows
- Busy areas
A quiet location improves your recording quality without needing extra editing.
Test Your Mic Position Before Recording
Before starting a meeting, stream, or recording session:
- Record a short voice sample.
- Listen to the audio.
- Adjust the microphone distance and angle.
- Repeat until your voice sounds clear.
A few small position changes can make a big difference in your microphone quality. Proper placement helps you get better sound without changing your microphone.

How to Select Your Mic as the Input Device
After connecting your microphone, you need to select it as the main input device on your computer or app. An input device is the microphone that your computer uses to capture your voice.
Sometimes, your computer may continue using the built-in microphone instead of your external mic. Selecting the correct input device makes sure your voice gets recorded through the microphone you want to use.
How to Select a Mic on Windows
Follow these steps to choose your microphone on a Windows computer:
- Open Settings on your computer.
- Click on System.
- Select Sound.
- Find the Input section.
- Choose your connected microphone from the list.
- Speak into the microphone and check the input level.
If the input bar moves when you speak, Windows has selected your microphone correctly.
Allow Microphone Access on Windows
Windows may block microphone access for privacy reasons. You need to allow access before using your mic.
Follow these steps:
- Open Settings.
- Go to Privacy & Security.
- Select Microphone.
- Turn on microphone access.
- Allow apps to use your microphone.
After enabling access, restart the app you want to use with your microphone.
How to Select a Mic on Mac
Follow these steps to choose your microphone on a Mac:
- Open System Settings.
- Click Sound.
- Select the Input tab.
- Choose your connected microphone.
- Adjust the input volume if needed.
Your Mac will now use the selected microphone for recording and voice communication.
How to Select a Mic in Apps
Many apps have their own microphone settings. Even if your computer detects the mic, the app may use a different audio device.
You can select your microphone in apps like:
- Video calling apps
- Gaming apps
- Streaming software
- Recording programs
To change the microphone:
- Open the app settings.
- Find the audio or microphone section.
- Select your microphone.
- Test your voice.
Always check the app settings before an important meeting, recording, or live stream.
Check If Your Mic Is Selected Correctly
After choosing your microphone, check these points:
- The correct microphone name appears in settings.
- The input level moves when you speak.
- The microphone is not muted.
- The volume level is high enough.
- The app uses the same microphone you selected.
Selecting the right input device ensures your microphone captures your voice clearly and avoids problems like no sound or poor audio quality.
Adjust Microphone Settings for Clear Audio
After selecting your microphone, you need to adjust its settings to get clear and balanced sound. The right settings help your voice sound louder, cleaner, and more natural. Small changes in volume, gain, and audio features can improve your recording quality.
Use these settings to get better microphone performance:
- Set the right microphone volume: Adjust the microphone volume so your voice sounds clear without being too quiet or too loud. A very high volume level can make your audio sound distorted.
- Adjust microphone gain: Gain controls how much sound your microphone picks up. Increase it if your voice sounds low, but avoid setting it too high because it can capture unwanted background noise.
- Choose the correct input level: Check the input meter while speaking. Keep the level in a safe range where your voice stays clear and does not reach the maximum limit.
- Turn on noise reduction when needed: Noise reduction can remove unwanted sounds like fan noise, keyboard sounds, or background activity. Use it when you record in a noisy place.
- Enable echo cancellation for calls: Echo cancellation helps reduce repeated sounds during online meetings or voice chats. It is useful when you use speakers instead of headphones.
- Adjust microphone sensitivity: Sensitivity controls how easily your microphone detects sound. Set it properly so the mic picks up your voice without capturing every small noise.
- Use the correct sample rate: A higher sample rate can improve audio quality for recording. For normal voice calls and basic recordings, standard settings usually work well.
- Avoid using too many audio effects: Extra effects can make your voice sound unnatural. Use only the settings you need for your purpose.
- Test your settings before use: Record a short audio clip after making changes. Listen carefully and adjust the settings until your voice sounds clear and comfortable.
How to Test Your Microphone After Setup
After setting up your microphone, test it to make sure it works properly. A quick check helps you find sound problems before recording, gaming, or joining a meeting.
- Check input level: Speak into the mic and make sure the volume bar moves in your device settings.
- Record your voice: Make a short recording and listen for clear sound quality.
- Check volume: Adjust the mic volume if your voice sounds too low or too loud.
- Remove background noise: Test in a quiet place to avoid unwanted sounds.
- Test in apps: Check your microphone in apps like video calls, games, or recording software.
- Check connections: Make sure the cable is secure, and the mic is not muted.
How to Make Your Microphone Sound Better
A proper microphone setup improves your audio quality, but a few extra adjustments can make your voice sound even clearer. You can improve your microphone sound by controlling noise, adjusting your position, and using the right settings.
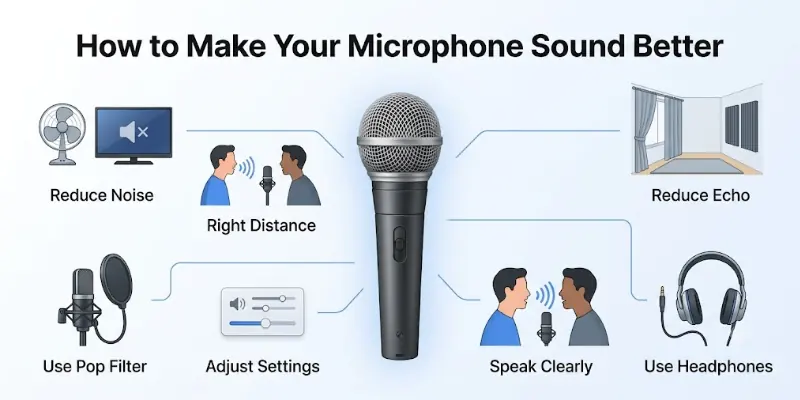
- Reduce background noise: Use your microphone in a quiet room and keep it away from fans, TVs, and other noisy devices.
- Keep the right distance: Place the microphone close enough to capture your voice clearly without creating loud breathing sounds.
- Use a pop filter: A pop filter reduces harsh air sounds when you say words with strong P and B sounds.
- Adjust microphone settings: Balance the volume, gain, and other audio settings to avoid low or distorted sound.
- Improve your room setup: Soft items like curtains, carpets, and furniture can help reduce echo.
- Speak clearly: Keep a steady voice level and speak toward the correct side of the microphone.
- Use headphones: Headphones help prevent echo and allow you to hear your audio quality while recording.
Common Mic Setup Mistakes to Avoid
Many beginners face audio problems because of small setup mistakes. Avoiding these common errors can help you get clear and better-quality sound from your microphone:
- Placing the microphone too far away: A distant microphone may make your voice sound weak and unclear. Keep it at a suitable distance for better sound.
- Using the wrong input device: Your computer or app may use a different microphone instead of the one you connected. Always select the correct mic in settings.
- Setting the volume too high: High volume levels can create distortion and make your voice sound rough. Adjust the volume until your audio sounds balanced.
- Ignoring microphone placement: Wrong positioning can increase noise and reduce sound quality. Place the mic near your mouth and point it correctly.
- Not testing the microphone: Skipping a quick audio test can cause problems during meetings, recordings, or live streams.
- Using a noisy environment: Background sounds can affect your recording quality. Choose a quiet place and remove unnecessary noise.
- Forgetting to check cables: Loose or damaged cables can cause connection issues, low sound, or sudden audio loss. Make sure all connections are secure.
Conclusion
In this guide, we have covered how to set up a mic. I personally suggest making small adjustments while testing, instead of trying to get perfect sound at once. Manage your setup by checking the device settings and mic position before each session.
Take a few minutes to do a quick sound test before recording, and make small tweaks if needed. Over time, you will learn the best distance and angle for your voice. This way, you can enjoy clear, professional audio without extra stress and feel confident in every recording or live session.
Helpful FAQs
Here are some frequently asked questions related to how to set up a mic:
When connecting a new microphone to your computer, always download drivers or software from official sources. Avoid unknown websites that may include malware. This simple step helps prevent computer virus risks while keeping your mic setup safe.
Open OBS Studio and go to the Sources section. Click the plus (+) button and choose “Audio Input Capture. It’s a simple way to add a mic to OBS.
In OBS, make sure your microphone is plugged in and detected by the system. Go to Settings → Audio → Mic/Auxiliary Device and select your mic. This is the standard way to connect a mic to OBS and ensure it works for live streaming.
In OBS Studio, adjust the input volume and enable noise suppression. You can also add gain if your voice is too quiet. Proper settings help your mic sound professional during recordings or live streams.
Open OBS and speak into your microphone while watching the audio mixer levels. If the bars move when you talk, your mic works correctly. This confirms it is capturing sound properly.
Yes, OBS allows adding OBS filters for the mic, such as noise suppression, compressor, and gain. Filters reduce background noise and balance your voice. Using these tools ensures your recordings and streams sound clear and professional.
Choose a simple way:
On Windows, open Settings → System → Sound → Input, or right-click the speaker icon on the taskbar. On Mac, go to System Preferences → Sound → Input. This answers where I can find my microphone settings to adjust volume and choose the correct device.
If your laptop mic is not working, first check if it is selected as the input device in sound settings. Restart your laptop and update the audio drivers. If the issue continues, test with another app or an external microphone to confirm the problem.

- Be Respectful
- Stay Relevant
- Stay Positive
- True Feedback
- Encourage Discussion
- Avoid Spamming
- No Fake News
- Don't Copy-Paste
- No Personal Attacks
- Be Respectful
- Stay Relevant
- Stay Positive
- True Feedback
- Encourage Discussion
- Avoid Spamming
- No Fake News
- Don't Copy-Paste
- No Personal Attacks