How to Clean Microphone for Perfect Sound in 2026
A microphone plays an important role in capturing clear and professional audio. Whether you use it for recording music, podcasting, streaming, gaming, online meetings, or public speaking, regular cleaning helps maintain both sound quality and hygiene.
Over time, dust, saliva, sweat, and oils can collect on the grille, windscreen, and other microphone parts. This buildup may block sound, create unpleasant odours, and even shorten the lifespan of your equipment. Fortunately, cleaning a microphone is simple when you use the right tools and methods.
In this guide, we will explain how to clean microphone safely, the supplies you need, the parts that require the most attention, common mistakes to avoid, and practical tips to keep your microphone in excellent condition for years to come.
Tools You Need to Clean a Microphone
Before you start cleaning, gather the right tools to make the process safe, effective, and damage-free:
- Microfiber cloth: soft and lint-free for wiping the microphone body.
- Small brush or soft toothbrush: to remove dust from crevices and buttons.
- Mild dish soap: gentle enough for washing removable parts like the grille or foam windscreen.
- Warm water: for rinsing foam covers and grilles.
- Isopropyl alcohol (70%): disinfects without harming the electronics.
- Compressed air (optional): blows dust out of hard-to-reach areas.
- Clean towel: for drying parts thoroughly before reassembling.
How to Clean a Microphone Step by Step
Cleaning a microphone is not only about hygiene. It also helps keep your sound clear and your device in good working condition.
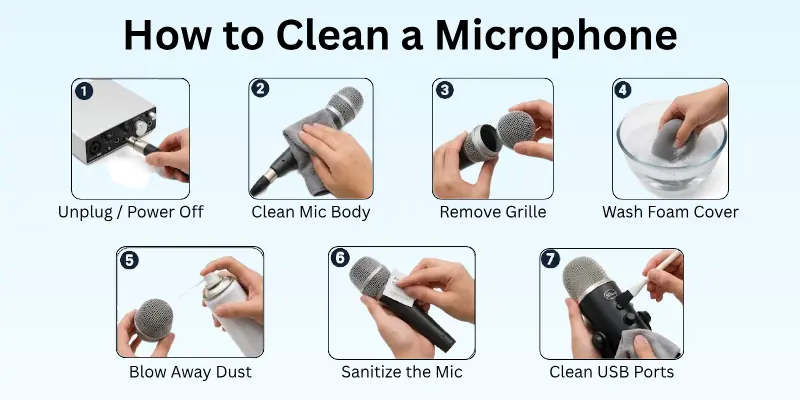
Follow these steps carefully to clean every part of your microphone safely:
1. Unplug and Power Off
Before you start, disconnect your microphone from all devices, such as a computer, mixer, or audio interface. If it is wireless, remove the batteries.
This step is important because cleaning a powered device can cause short circuits or permanent damage.
Tips:
- Check and remove all cables first
- Place the microphone on a clean, soft towel while cleaning
2. Clean the Handle or Body
The handle collects the most dirt because you hold it often. Sweat, oil, and dust can build up quickly.
How to clean:
- Use a slightly damp microfiber cloth
- Wipe the body gently from top to bottom
- Use 70% isopropyl alcohol on the cloth for light disinfection
Important: Do not let liquid enter buttons or openings.
Tip: Use a soft brush for grooves and textured areas.
3. Remove and Clean the Grille
The grille collects dust, saliva, and moisture, so it needs careful cleaning.
If removable:
- Unscrew or detach the grille carefully
- Wash it with warm water and mild soap
- Rinse well and let it dry completely before reattaching
If non-removable:
- Wipe gently with a damp microfiber cloth
- Use compressed air to remove dust from the mesh
Tip: Avoid hard brushes or rough cleaning pads.
4. Clean the Foam Windscreen
The foam windscreen absorbs moisture and oils from your breath.
Steps:
- Remove the foam cover carefully
- Wash it with warm water and mild soap
- Squeeze gently, do not twist or wring
- Let it air dry fully before reuse
Tip: Keep a spare windscreen for quick replacement.
5. Use Compressed Air for Dust Removal
Compressed air helps clean tight spaces and hidden dust.
Use it for:
- Buttons and switches
- Small gaps and crevices
- Inside grille openings
How to use:
- Hold the can upright
- Keep a safe distance from the mic
- Use short bursts only
Tip: Always use air after wiping for best results.
6. Disinfect Shared Microphones
If multiple people use the microphone, regular disinfection is important.
Steps:
- Wipe the handle and grille with alcohol wipes
- Avoid spraying liquid directly on the mic
- Focus on touch areas like grip and mesh
Tip: Use disposable covers or windscreens for shared use.
7. Clean USB and Headset Microphones Carefully
USB and headset microphones have built-in electronics, so they need extra care.
Steps:
- Clean with a soft, slightly damp cloth
- Avoid moisture near ports and buttons
- Do not open or disassemble the device
Tip: Use a soft brush or compressed air for small openings.

Different Types of Microphones and Their Cleaning Needs
Not all microphones are the same. Each type has a different design, and each one needs a slightly different cleaning method. Knowing this helps you avoid damage and keep your sound clear.
1. Dynamic Microphones
Dynamic microphones are strong and durable. They handle rough use better than most types.
- Clean the grille regularly
- Wipe the body with a soft cloth
- Use a brush or compressed air for dust
- Avoid soaking any part in water
2. Condenser Microphones
Condenser microphones are very sensitive and need extra care.
- Use only a dry or slightly damp cloth
- Avoid moisture near internal parts
- Clean the grille gently with a soft brush
- Do not use strong air pressure directly
3. USB Microphones
USB microphones have built-in electronics, so they need careful handling.
- Clean only the outer body
- Avoid liquids near USB ports
- Use a microfiber cloth for wiping
- Use a soft brush for small gaps
4. Headset Microphones
Headset microphones stay close to your mouth and collect sweat and oils.
- Clean foam covers often
- Wipe the mic boom and frame
- Replace or wash the ear and mic pads regularly
- Keep connectors dust-free
5. Lavalier Microphones
Lavalier microphones are small and easy to clip to clothing, but they collect fabric dust and sweat.
- Clean with a soft cloth or cotton swab
- Gently remove dust from the clip and capsule
- Avoid water inside the capsule
- Store in a clean pouch after use
Understanding your microphone type helps you clean it safely and maintain better sound quality for a longer time.

Key Areas to Focus On
When cleaning a microphone, some parts require extra attention because they collect the most dirt, sweat, and bacteria. Focusing on these areas ensures your microphone stays hygienic and sounds great:
- Grille (Metal Mesh Top): This is the part that comes in direct contact with breath and saliva. Dust and moisture build up here quickly, so clean it carefully.
- Foam Windscreen: Foam covers absorb moisture and oils from your voice. Regular washing keeps it fresh and prevents unpleasant odours.
- Handle/Body: The part you hold collects oils, sweat, and dirt from your hands. Wiping it regularly maintains hygiene.
- Buttons and Switches: Dust and grime can get trapped in small buttons or switches, affecting functionality. Use a brush or compressed air to clean these areas.
- Cable Connectors and Ports: Dirt or oxidation here can reduce audio quality or cause connection problems. Gently wipe or use compressed air to keep them clean.
Tip: Always let all cleaned parts dry completely before reassembling to avoid damage.
Common Mistakes to Avoid in Cleaning Mic
Cleaning a microphone may seem simple, but small errors can damage your equipment or reduce its lifespan. Avoid these common mistakes:
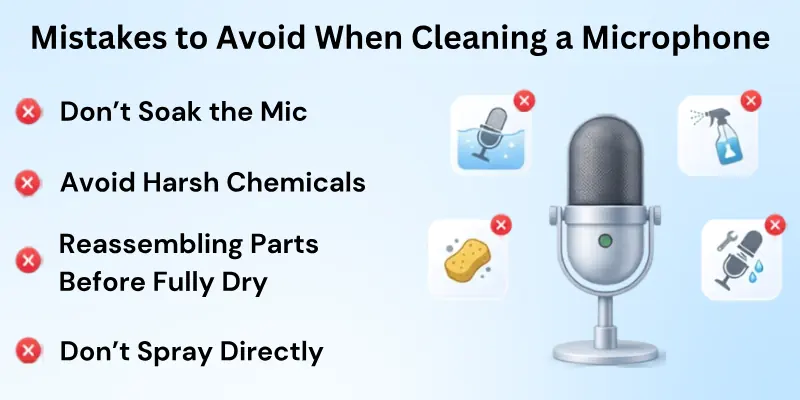
- Soaking the Entire Microphone: Submerging your mic in water can ruin the internal electronics. Always clean removable parts separately.
- Using Harsh Chemicals or Bleach: Strong cleaners can corrode metal, damage foam windscreens, and harm finishes. Stick to mild soap or alcohol wipes.
- Reassembling Parts Before They Are Fully Dry: Moisture trapped inside can cause corrosion, buzzing, or malfunction. Let everything dry completely.
- Spraying Liquids Directly on the Mic: Direct sprays can seep into sensitive components. Always apply liquids to a cloth first.
- Skipping Regular Cleaning: Dirt and oils build up over time. Waiting too long between cleanings can make dirt harder to remove and reduce sound quality.
- Using Abrasive Tools: Hard brushes or scrubbing pads can scratch the grille or body. Stick to microfiber cloths and soft brushes.
Tip: Following a proper routine and focusing on key areas like the grille, windscreen, and handle will help your microphone last longer and stay hygienic.
Final Words
Today, we covered everything you need to know about how to clean a microphone safely and effectively. We discussed the tools required for cleaning, the key microphone parts that need attention, step-by-step cleaning methods, common mistakes to avoid, and best practices for maintaining different types of microphones.
Regular cleaning helps remove dust, oils, moisture, and bacteria that can affect both sound quality and microphone hygiene. By following a simple maintenance routine, you can protect your equipment, improve audio performance, and extend the life of your microphone.
We recommend inspecting your microphone regularly and cleaning it before dirt buildup becomes a problem. A few minutes of care can make a noticeable difference in how your microphone looks, performs, and lasts over time.
Frequently Asked Questions
Here’s a list of questions often asked about cleaning microphones:
It depends on how often you use your microphone.
- Personal use: every 2–4 weeks
- Studio or shared microphones: after every session
- Heavy performers: after each use
Regular cleaning keeps the sound clear and prevents bacterial buildup. It also helps your microphone last longer.
Yes, you can use alcohol wipes, but you must be careful. Lightly wipe only the outer body and grille.
Avoid spraying liquid directly on the microphone. Too much moisture can enter small openings and damage internal parts.
Alcohol works well for removing germs and light dirt without harming most microphone surfaces.
Yes, foam windscreens are safe to wash when done properly.
- Use warm water and mild soap
- Gently squeeze to clean dirt
- Do not twist or wring it
- Let it air dry fully before reuse
A wet windscreen can damage sound quality, so always make sure it is completely dry.
No, you should never clean a microphone while it is plugged in or powered on. Moisture or cleaning tools can damage internal electronics if the device is active.
Always unplug cables and remove batteries before cleaning. This simple step protects your microphone from short circuits and permanent damage.
Avoiding the wrong methods is just as important as cleaning correctly.
- Do not soak the microphone in water
- Do not use bleach or strong chemicals
- Do not spray liquid directly on the mic
- Do not reassemble parts before drying
These mistakes can reduce sound quality and damage the device.
USB and headset microphones need gentle cleaning because they have built-in electronics.
- Wipe with a soft microfiber cloth
- Keep moisture away from ports and buttons
- Do not open or disassemble the device
Careful cleaning helps protect internal components and keeps performance stable.
Yes, a dirty microphone can reduce sound quality. Dust, oil, and moisture can block sound input and create muffled audio.
You may notice low volume, unclear voice, or background noise. Regular cleaning helps keep recordings clean and professional.
A bad smell usually comes from sweat, moisture, and bacterial buildup on the foam or grille.
This happens when the microphone is not cleaned regularly. Washing the windscreen and cleaning the grille can remove the odour and improve hygiene.
Compressed air is safe if used correctly, but misuse can cause damage. Use short bursts and keep a safe distance. Do not spray too close to the grille or internal parts. Proper use helps remove dust without pushing it deeper inside.
Safe storage helps keep your microphone cleaner for longer.
- Store in a dry and dust-free place
- Use a protective case or pouch
- Keep away from moisture and heat
- Cover the grille when not in use
Good storage habits reduce cleaning frequency and protect sound quality.


- Be Respectful
- Stay Relevant
- Stay Positive
- True Feedback
- Encourage Discussion
- Avoid Spamming
- No Fake News
- Don't Copy-Paste
- No Personal Attacks
- Be Respectful
- Stay Relevant
- Stay Positive
- True Feedback
- Encourage Discussion
- Avoid Spamming
- No Fake News
- Don't Copy-Paste
- No Personal Attacks