How to Test a Microphone – Easy Audio Check Tips in 2026
Have you ever joined an online meeting or started recording something, only to realize that your microphone isn’t working properly? It can be frustrating when people can’t hear you clearly, or your audio sounds too low or distorted. Many users face this issue simply because they never checked their microphone before using it.
The good news is that fixing this problem is usually very simple. In this guide on how to test a microphone, you’ll learn easy ways to check whether your mic is working correctly.
This step-by-step guide will help you quickly confirm your microphone’s audio so that you can avoid unexpected problems during calls, recordings, or streaming.
Why Should You Test a Microphone?
Testing a microphone before you use it helps you avoid audio problems and makes sure people can hear you clearly. A quick microphone test only takes a few minutes, but it can save you from interruptions during important calls, recordings, or live streams.
Here are some reasons to test your microphone:
- Check if your microphone is working: Make sure your device detects the microphone and records your voice correctly.
- Avoid audio problems: Find issues like low volume, distortion, or no sound before they affect your meeting or recording.
- Improve sound quality: Adjust the microphone settings to make your voice sound clear and balanced.
- Prepare for online meetings: Test your microphone before video calls so others can hear you without problems.
- Get better recordings: Confirm that your microphone captures clean audio for podcasts, videos, or voice recordings.
- Prevent streaming issues: Check your microphone before going live to avoid unexpected sound problems.
- Save time and reduce stress: Finding and fixing problems early helps you avoid delays and technical interruptions.
How to Test a Microphone – Step-by-Step Guide
Testing your microphone does not require technical skills or complicated tools. You just need to follow a few simple actions to confirm that your mic is working correctly.
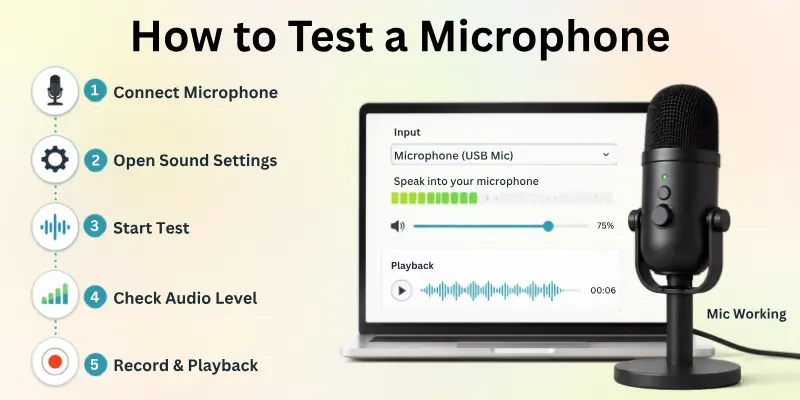
The steps below will guide you through the process clearly and easily.
Step 1: Connect or Enable Your Microphone
First, make sure your microphone is ready to use. If you are using an external microphone, plug it into your computer using a USB port or audio jack. Push the cable in firmly so the device recognizes it.
If your device has a built-in microphone, you usually don’t need to connect anything. Your computer should detect it automatically when you open your sound settings.
Step 2: Open Your Device Sound Settings
Next, open the sound settings on your device. On most computers, you can do this by going to Settings and selecting Sound or Audio.
Look for the Input section and choose the microphone you want to test. If your device shows multiple microphones, select the one you plan to use.
Step 3: Start the Microphone Test
Now begin the microphone test. Many devices include a built-in test option in the sound settings. You can also open an online microphone testing tool in your browser.
Speak clearly into the microphone using your normal voice. Try saying a few sentences so the system can detect your audio input.
Step 4: Check the Audio Input Level
While you speak, watch the audio input meter on your screen. The level bar should move up and down as you talk. This movement shows that your microphone is picking up sound.
If the meter barely moves, increase the microphone input volume in your settings. If the level stays too high, lower the volume to avoid distortion.
Step 5: Record and Playback Your Voice
Finally, record a short audio sample to check the quality of your microphone. You can use a voice recorder app or recording software on your device.

Speak for a few seconds, then play the recording back. Listen carefully to make sure the sound is clear, loud enough, and free from background noise or distortion.
How to Check a Mic on Different Devices
Different devices handle audio settings in different ways, yet testing a microphone follows a similar idea. You only need to select the right input and verify the sound. Choose your device below and follow the steps carefully.
Test a Microphone on Windows
First, open the sound settings from the Start menu. Go to the Sound section and look for the Input area. Select your microphone from the available list of devices.
Speak into the microphone and watch the input level bar. If the bar moves when you talk, your microphone is working correctly. You can also adjust the volume level if the sound seems too low or too high.
Test a Microphone on Mac
Open the System Settings and go to the Sound option. Click on the Input tab to see the list of available microphones. Select the microphone you want to use.
Now speak normally and check the input indicator on the screen. If you see the level moving, your microphone is detecting sound properly. Adjust the input volume if needed for better clarity.
Test a Microphone on Mobile
On a mobile device, open the built-in voice recorder app. Start a new recording and speak clearly into the microphone.
After recording, stop and play the audio file. Listen carefully to confirm that your voice sounds clear and the volume is strong enough. If the sound is low or unclear, check your microphone permissions or device settings.
Tips for Accurate Microphone Testing
Getting accurate results during a microphone test depends on how you prepare and use your device. Small adjustments can make a big difference in sound quality.
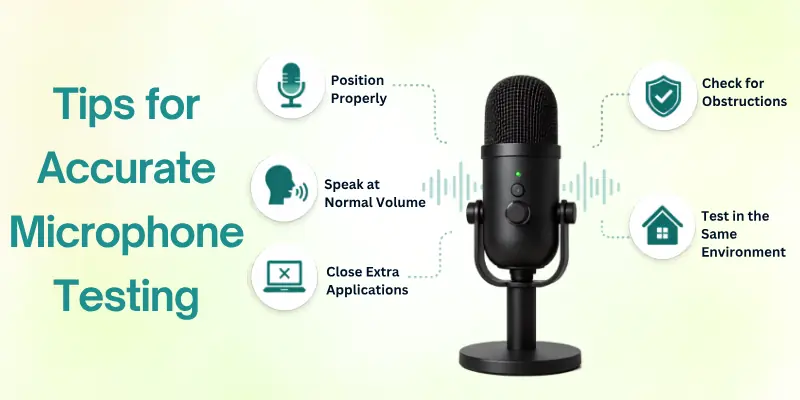
Follow these practical tips to make sure your test gives you reliable results:
- Position the Microphone Correctly: Place the microphone at a comfortable distance and angle it toward your mouth. Proper positioning helps capture your voice clearly without distortion.
- Speak at a Normal Volume: Avoid shouting or whispering while testing. Use your natural speaking voice so you can understand how it will sound in real situations.
- Close Unnecessary Applications: Turn off apps that use the microphone in the background. This prevents conflicts and ensures the test runs smoothly.
- Check for Physical Obstructions: Make sure nothing is blocking the microphone opening. Even small objects or dust can affect sound clarity.
- Test in the Same Environment You Will Use It: If you plan to use the microphone for meetings or recording, test it in that same setup. This helps you evaluate real performance conditions.
These simple practices help you get clear, accurate results and avoid confusion during testing.
How to Test a Microphone Online
Testing a microphone online is one of the fastest ways to check if it is working correctly. You do not need to install any software. Most online microphone testing tools work directly in your web browser and show your microphone input in real time.
Follow these simple steps:
- Open an Online Microphone Test Tool: Open an online microphone testing tool, such as the one available on LGAtool.com, in your web browser. These tools are free, easy to use, and work on most computers and mobile devices.
- Allow Microphone Access: When your browser asks for permission, click Allow so the website can use your microphone. If you block access, the test will not work.
- Select Your Microphone: If your device has more than one microphone, choose the one you want to test from the list of available input devices.
- Speak Into the Microphone: Talk in your normal voice for a few seconds. Keep the microphone at a comfortable distance from your mouth for the best results.
- Check the Sound Level: Watch the audio level meter on the screen. If the meter moves while you speak, your microphone is working properly.
- Listen to the Recording (If Available): Some online tools let you record and play back your voice. Listen to the recording to check that your voice sounds clear and free from background noise or distortion.
Online microphone testing is a quick and easy way to confirm that your microphone works before joining a meeting, recording audio, or starting a live stream.

What to Do If Your Microphone Is Not Working
If your microphone does not work during testing, don’t panic. Most microphone issues happen because of small settings or connection problems. Follow the steps below to fix the issue quickly and get your microphone working again.
- Reconnect the Microphone: Unplug the microphone and plug it back in properly. If you use a USB microphone, try a different USB port to rule out connection problems.
- Check Device and Browser Permissions: Make sure your system and browser allow microphone access. If permissions are blocked, enable them in your settings so the microphone can function.
- Change the Default Input Device: Go to your sound settings and select the correct microphone as the default input. Sometimes the system chooses the wrong device automatically.
- Update Audio Drivers: Outdated drivers can cause sound issues. Check for updates in your device settings and install the latest audio drivers if available.
- Restart Your Device: A simple restart can fix temporary software glitches. After restarting, test your microphone again to see if the problem is resolved.
These steps solve the most common microphone problems and help you restore normal audio performance quickly.
Conclusion
In this guide, you have learned how to test a microphone, confirm that it is working, and make sure the sound is clear. This helps you avoid audio problems during meetings, recordings, gaming, or online calls. Now you know how to test microphone quality simply and practically.
A quick microphone test can save you time and prevent stress. When you check your microphone before using it, you feel more confident and prepared. Make it a habit to test your mic whenever you connect a new device or start an important session.
Next, you can practice adjusting your sound settings, try different microphone positions, or explore additional audio options on your device. With a little practice, you will handle microphone settings easily and speak with confidence every time.
FAQs
Here are some frequently asked questions about how to test mic quality:
You can hear yourself by enabling the listen or microphone monitoring option in your device’s sound settings. Once you turn it on, anything you say into the microphone plays through your speakers or headphones. This helps you check your voice and audio quality in real time.
Yes, testing a USB microphone is easy.
- Plug the USB microphone into your computer.
- Wait for your device to detect it.
- Select it as the default input device in your sound settings.
- Speak into the microphone and watch the input level.
- Record a short clip and play it back to check the sound quality.
First, pair your Bluetooth microphone with your device and make sure the battery has enough power.
Next, open your sound settings and select the Bluetooth microphone as the input device. Speak into the microphone and check the input level or record a short voice clip. If your voice sounds clear during playback, your Bluetooth microphone is working correctly.
A muffled microphone usually happens because something blocks the microphone, the input volume is too low, or the microphone is too far from your mouth. Dust, dirt, or a poor internet connection during online calls can also affect audio quality.
Clean the microphone gently, move it closer to your mouth, adjust the input volume, and test it again. If the problem continues, try using the microphone on another device to check if it has a hardware issue.
Yes. Most computers and mobile devices let you test a microphone using their built-in sound settings or a voice recorder app. You can also use a free online microphone test in your web browser without installing any extra software.
You can improve your microphone quality by following these simple tips:
- Speak at a normal distance from the microphone.
- Record in a quiet room.
- Remove dust or dirt from the microphone.
- Increase the input volume if your voice is too low.
- Reduce background noise whenever possible.
- Use a pop filter or windscreen for clearer audio.
- Keep your audio drivers updated.
Microphone delay, also called audio latency, can happen because of slow software, outdated audio drivers, or a weak Bluetooth connection. Running too many programs at the same time can also slow audio processing.
Restart your device, update your audio drivers, and close unnecessary applications. If you use a Bluetooth microphone, move closer to your device or use a wired microphone for a faster connection.
It depends on the testing method you use. Some microphone testing tools only show your audio input level and do not save or record your voice. Others include a recording feature so you can play your voice back and check the sound quality.
If you use a voice recorder app or recording software, your voice will be recorded until you delete the file. Always check the tool’s features if you are concerned about recordings.


- Be Respectful
- Stay Relevant
- Stay Positive
- True Feedback
- Encourage Discussion
- Avoid Spamming
- No Fake News
- Don't Copy-Paste
- No Personal Attacks
- Be Respectful
- Stay Relevant
- Stay Positive
- True Feedback
- Encourage Discussion
- Avoid Spamming
- No Fake News
- Don't Copy-Paste
- No Personal Attacks