How to Set Up a Webcam for Clear and Smooth Video
Whether you want to join a video meeting, attend an online class, stream live, or record videos, your webcam needs to work properly. A webcam that is set up the right way gives you clear video, better sound, and fewer technical problems. The good news is that you can set up most webcams in just a few minutes, even if you have never done it before.
A webcam is a small camera that lets you record videos, join video calls, attend online classes, live stream, and chat with family, friends, or coworkers. Many laptops come with a built-in webcam, while desktop computers often use an external USB webcam.
In this guide, you will learn how to set up a webcam step by step. You will also learn how to connect it to your computer, install any required software, adjust the settings, improve video quality, fix common webcam problems, and choose the best webcam position for clear and professional-looking video.
What You Need Before Setting Up a Webcam
Before you set up a webcam, make sure you have everything ready. This helps you complete the setup faster and avoid common problems:
- A Compatible Computer: First, check that your computer supports the webcam. Most modern Windows PCs and Macs work with USB webcams. If you have an older computer, check the webcam’s system requirements before you connect it.
- A Working USB Port or Built-in Camera: If you use an external webcam, you need an available USB port. Plug the webcam into the port securely. If your laptop has a built-in webcam, you do not need any extra cables.
- A Stable Internet Connection: You do not need the internet to connect a webcam. However, you need a stable internet connection to download drivers, install software, update the webcam, and join video calls.
- Webcam Drivers or Software: Many webcams work as soon as you plug them in. Some models need drivers or software from the manufacturer. Install them if Windows or your Mac asks for them.
- A Good Place to Mount the Webcam: Choose a stable place for your webcam. Most webcams clip onto the top of a monitor or laptop screen. You can also use a tripod if your webcam supports one.
- Good Lighting: Place a light source in front of you instead of behind you. Good lighting makes your face look brighter and clearer during video calls and recordings.
- Camera and Microphone Permissions: Your computer must allow apps to use the webcam. Check your privacy settings and give camera and microphone access to the apps you plan to use, such as Zoom, Google Meet, or Microsoft Teams.
- A Video Calling or Recording App: Install the app you want to use with your webcam. Popular choices include Zoom, Microsoft Teams, Google Meet, Skype, and the Windows Camera app for testing.
How to Setup a Webcam on Windows
Setting up a webcam on Windows is simple. Most webcams work as soon as you connect them. Follow these steps to get your webcam ready.
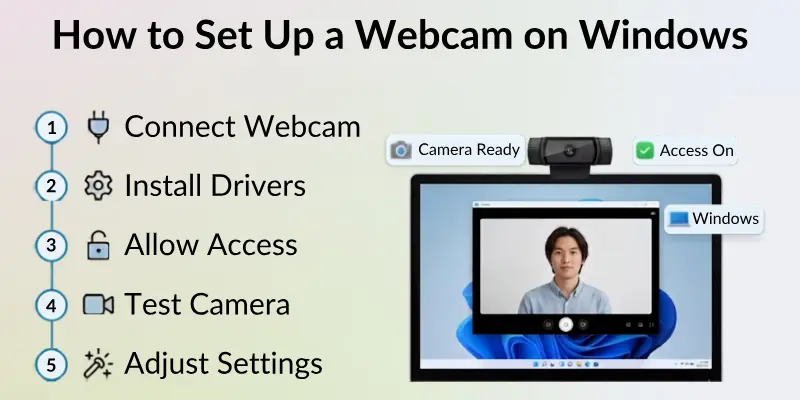
Step 1: Connect the Webcam: If you have an external webcam, plug it into an available USB port on your computer. Place the webcam on top of your monitor or laptop screen and adjust it to face you. If you have a built-in webcam, you can skip this step.
Step 2: Let Windows Detect the Webcam: Windows usually detects a new webcam automatically. Wait a few moments while your computer installs the required files. If you see a message that your device is ready to use, move to the next step.
Step 3: Install Webcam Drivers (If Needed): Some webcams need drivers or setup software to work correctly:
- Insert the setup CD if one comes with your webcam.
- Or download the latest drivers from the webcam manufacturer’s website.
- Follow the on-screen instructions to complete the installation.
- Restart your computer if prompted.
Step 4: Allow Camera Access: Your webcam will not work if camera access is turned off.
To enable it:
- Open Settings.
- Click Privacy & Security.
- Select Camera.
- Turn on Camera access.
- Allow the apps you want to use, such as Zoom, Microsoft Teams, or Google Meet.
Step 5: Set the Webcam as the Default Camera (If Needed): If your computer has more than one camera, choose the webcam you want to use.
- Open your video calling or recording app.
- Go to the app’s Settings.
- Find the Camera option.
- Select your webcam from the list.
Step 6: Test the Webcam: Open the Camera app on Windows.
- Click Start and search for Camera.
- Open the app.
- Check if you can see a clear live video.
- Adjust the webcam angle if needed.
You can also test the webcam in apps like Zoom, Microsoft Teams, or Google Meet before joining a meeting.
Step 7: Adjust Webcam Settings: After your webcam works, improve the video quality by:
- Placing the webcam at eye level.
- Using good lighting.
- Cleaning the camera lens.
- Adjusting brightness and focus if your webcam software allows it.
Once these steps are complete, your webcam is ready for video calls, online classes, live streaming, and video recording.

How to Set Up Webcam on a Mac
Most webcams are easy to set up on a Mac. Many external webcams work as soon as you connect them, while built-in webcams are ready to use without any setup.
Step 1: Connect the Webcam
If you have an external webcam, plug it into an available USB or USB-C port on your Mac. If your webcam uses a USB-A cable and your Mac only has USB-C ports, use a compatible USB adapter. If you have a built-in webcam, you can skip this step.
Step 2: Install Webcam Software (If Needed)
Many webcams work without extra software. However, some models need drivers or a companion app.
- Download the latest software from the webcam manufacturer’s website.
- Follow the installation steps.
- Restart your Mac if prompted.
Step 3: Allow Camera Access
Your Mac must allow apps to use the webcam.
- Open System Settings.
- Click Privacy & Security.
- Select Camera.
- Turn on camera access for the apps you want to use, such as Zoom, Google Meet, Microsoft Teams, or FaceTime.
Step 4: Select the Webcam
If you have more than one camera connected:
- Open your video calling or recording app.
- Go to the app’s Settings or Preferences.
- Open the Camera section.
- Choose your webcam from the list.
Step 5: Test the Webcam
Open an app that uses the camera, such as FaceTime, Photo Booth, or your preferred video calling app.
- Check if the live video appears.
- Make sure the picture is clear.
- Adjust the webcam angle if needed.
Step 6: Improve the Webcam Setup
For better video quality:
- Place the webcam at eye level.
- Sit in a well-lit area.
- Clean the webcam lens with a soft cloth.
- Keep your background neat and free of distractions.
After completing these steps, your webcam is ready for video calls, online meetings, streaming, and recording on your Mac.

How to Position Your Webcam Correctly
The right webcam position can improve your video quality and help you look more natural during video calls. A few simple changes can make your image clearer and more professional.
- Place the webcam at eye level: Position the camera so it lines up with your eyes. This creates a natural viewing angle and better eye contact.
- Center the webcam: Place the webcam in the middle of your monitor or laptop screen so your face stays in the center of the frame.
- Keep the right distance: Sit about an arm’s length away from the webcam. This keeps your face clear without looking too close or too far away.
- Use good lighting: Place a light in front of you instead of behind you. Good lighting helps the camera capture a brighter and clearer image.
- Adjust the camera angle: Tilt the webcam until it captures your head and shoulders. Avoid pointing the camera too high or too low.
- Keep the webcam stable: Make sure the webcam is attached securely to prevent shaking or movement during calls.
- Choose a clean background: Use a tidy, distraction-free background so people can focus on you instead of your surroundings.
- Look at the webcam while speaking: Looking at the camera instead of the screen helps you maintain better eye contact during meetings and video calls.
How to Connect a Webcam to Popular Video Apps
After setting up your webcam, you need to connect it to the video app you want to use. Most apps let you choose your webcam from the settings menu. Follow these steps for the most popular video calling apps.
Zoom
- Open Zoom and sign in.
- Click the Settings icon.
- Select Video.
- Choose your webcam from the Camera list.
- Check the preview to make sure the webcam works.
Microsoft Teams
- Open Microsoft Teams.
- Click Settings.
- Select Devices.
- Choose your webcam under Camera.
- Check the preview before joining a meeting.
Google Meet
- Open Google Meet in your web browser.
- Click the Settings icon.
- Open the Video tab.
- Select your webcam from the camera list.
- Join the meeting after checking the preview.
Skype
- Open Skype.
- Click Settings.
- Select Audio & Video.
- Choose your webcam under Camera.
- Make sure the live preview appears.
Discord
- Open Discord.
- Click the User Settings icon.
- Select Voice & Video.
- Choose your webcam from the Camera menu.
- Click Test Video to check if it works.
How to Install Webcam Software
Most webcams work as soon as you connect them to your computer. However, some models need software or drivers to unlock all features and improve performance.
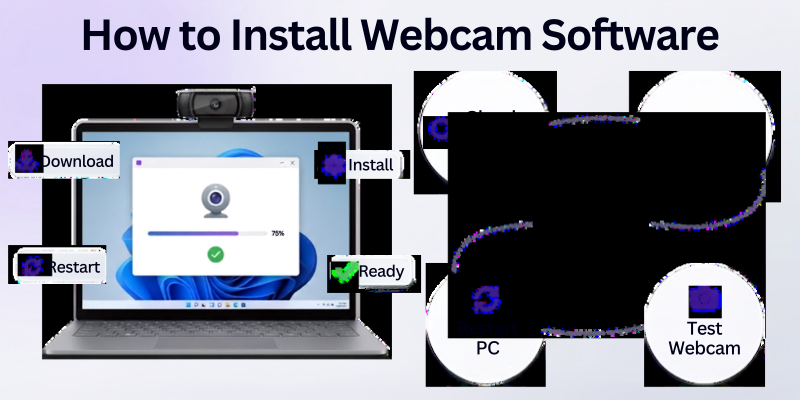
Follow these steps to install your webcam software:
Step 1: Check if Software Is Needed
After connecting the webcam, see if it works in the Camera app or a video calling app. If it does not work or some features are missing, you may need to install the webcam software.
Step 2: Download the Software
Visit the webcam manufacturer’s official website and download the latest software or drivers for your webcam model. Make sure you choose the correct version for your operating system.
Step 3: Install the Software
Open the downloaded file and follow the on-screen instructions. Accept the terms if asked and complete the installation process.
Step 4: Restart Your Computer
Some webcam software needs a restart before it works properly. Restart your computer if the installer asks you to do so.
Step 5: Connect and Test the Webcam
After the installation is complete, connect the webcam if it is not already plugged in. Open the Camera app or your favourite video calling app to make sure the webcam is working correctly.
Step 6: Check for Software Updates
Open the webcam software from time to time and install any available updates. Updates can improve performance, fix bugs, and add new features.
How to Adjust Webcam Settings
After setting up your webcam, adjust its settings to get better video quality. Most webcams let you change options through the webcam software or your video calling app:
- Change the Resolution: Choose a higher resolution, such as 1080p, if your webcam and computer support it. A higher resolution gives you a sharper and clearer picture.
- Adjust Brightness: Increase or decrease the brightness until your face looks clear. Good lighting and the right brightness help improve video quality.
- Improve the Focus: If your webcam supports autofocus, turn it on to keep your face sharp. If it has manual focus, adjust the focus ring until the image looks clear.
- Change the Frame Rate: Set the frame rate to 30 FPS or higher if available. A higher frame rate makes video look smoother, especially during movement.
- Adjust Contrast and Colour: If your webcam software includes these options, adjust the contrast, saturation, and colour settings to create a more natural-looking image.
- Enable Auto Exposure: Turn on auto exposure if your webcam supports it. This feature automatically adjusts the brightness when the lighting changes.
- Mirror or Flip the Image: Some webcam apps let you mirror or flip the video. Choose the option that gives you the most natural view.
- Save Your Settings: After making your changes, save the settings and test your webcam in a video calling or recording app to make sure everything looks the way you want.
Common Webcam Setup Problems and How to Fix Them
You may face a few problems while setting up your webcam. Most of these issues are easy to fix by following a few simple steps:
- Webcam is not detected: Make sure the webcam is plugged in properly. Try a different USB port and restart your computer. If needed, reinstall the webcam drivers.
- Webcam shows a black screen: Check if another app is already using the webcam. Close other apps, allow camera permissions, and restart the video app.
- Webcam image is blurry: Clean the webcam lens with a soft cloth. Adjust the focus if your webcam supports it, and make sure there is enough light.
- Webcam keeps freezing: Disconnect and reconnect the webcam. Update the webcam drivers and close unnecessary programs running in the background.
- Webcam is too dark: Move to a brighter room or place a light in front of you. You can also increase the brightness in your webcam settings.
- Webcam is not working in Zoom or Teams: Open the app settings and make sure the correct webcam is selected. Also, check that the app has permission to use your camera.
- Computer cannot find the webcam: Disconnect the webcam, restart your computer, and connect it again. If the problem continues, update or reinstall the webcam drivers.
- Poor video quality: Increase the webcam resolution if available, improve your lighting, clean the lens, and make sure your internet connection is stable during video calls.
- No camera permissions: Open your computer’s privacy settings and allow camera access for the apps you want to use.
- Webcam disconnects randomly: Check that the USB cable is secure. If possible, connect the webcam directly to your computer instead of using a USB hub.
When Should You Upgrade Your Webcam?
If your current webcam no longer meets your needs, it may be time to replace it. A newer webcam can provide better video quality, clearer sound, and more useful features:
- Your video looks blurry: If the image stays blurry even after cleaning the lens and adjusting the settings, consider upgrading to a higher-quality webcam.
- The video resolution is too low: Older webcams may only support low resolutions. A webcam with 1080p or 4K resolution gives you a sharper picture.
- The webcam often freezes or disconnects: Frequent connection problems may mean your webcam is worn out or no longer works properly.
- The microphone quality is poor: If people have trouble hearing you, a webcam with a better built-in microphone can improve your calls.
- It does not support new software: Some older webcams are not compatible with the latest operating systems or video calling apps.
- You need better features: If you stream, record videos, or attend online meetings often, look for features like autofocus, automatic light adjustment, a wide-angle lens, or noise reduction.
- You use your webcam every day: If you rely on your webcam for work, school, or content creation, upgrading to a more reliable model can improve your overall experience.
Conclusion
It’s time to conclude! In this article, we’ve covered how to set up webcam in detail. From plugging it in to testing it and joining video calls, the steps are easy if you follow them one by one.
I recommend keeping your webcam clean and using natural light for the best video quality. If this guide helped you, feel free to share it with friends who might need it too!
If you have any issues, then comment to us. Our team is always ready to help you
Helpful FAQs
Here are the answers to some common questions about how to activate a webcam:
To set up a webcam on your computer, connect it to a USB port if it is an external webcam. Wait for your computer to detect the device and install any required drivers. Then allow camera permissions, open the Camera app to test it, and select the webcam in your video calling or recording app.
Most modern webcams do not need manual driver installation because Windows and macOS install the required drivers automatically. However, some webcams need drivers or software from the manufacturer to unlock all features or work correctly.
Common reasons include:
- The webcam is not plugged in properly.
- Camera permissions are turned off.
- The webcam drivers are missing or outdated.
- Another app is already using the webcam.
- The USB port is not working properly.
You can test your webcam by opening the Camera app on Windows or Photo Booth on a Mac. You can also open a video calling app like Zoom or Google Meet and check the camera preview before joining a meeting.
Follow these steps:
- Open Settings.
- Click Privacy & Security.
- Select Camera.
- Turn on Camera access.
- Allow access for the apps you want to use.
Yes. Most plug-and-play webcams work without installing extra software. Simply connect the webcam, and your computer should detect it automatically. Some advanced features may still require the manufacturer’s software.
You can improve webcam quality by:
- Using good lighting.
- Cleaning the webcam lens.
- Placing the webcam at eye level.
- Choosing a higher video resolution.
- Keeping your webcam drivers updated.
A blurry webcam is usually caused by a dirty lens, poor lighting, or incorrect focus. Clean the lens with a soft cloth, move to a brighter area, and adjust the focus if your webcam supports manual focus. Also, make sure you are sitting at a suitable distance from the camera.


- Be Respectful
- Stay Relevant
- Stay Positive
- True Feedback
- Encourage Discussion
- Avoid Spamming
- No Fake News
- Don't Copy-Paste
- No Personal Attacks
- Be Respectful
- Stay Relevant
- Stay Positive
- True Feedback
- Encourage Discussion
- Avoid Spamming
- No Fake News
- Don't Copy-Paste
- No Personal Attacks