
How to Reduce Mic Background Noise for Beginners in 2026
Why does your microphone capture everything except your voice clearly? Clear audio matters more than most people think. Studies in online meetings show that people lose focus fast when background noise interrupts a speaker.
I have tested many microphones while recording videos and online tutorials, and I see this problem often.
A fan, keyboard clicks, or street traffic can easily ruin a recording. If you want clean audio, you need to learn how to reduce mic background noise using simple settings, better mic placement, and a few practical tools.
15 Best Ways to Reduce Mic Background Noise
Background noise can make your voice hard to hear. The good news is that you can fix most microphone noise without spending a lot of money. Small changes to your room, microphone, and settings can make a big difference.
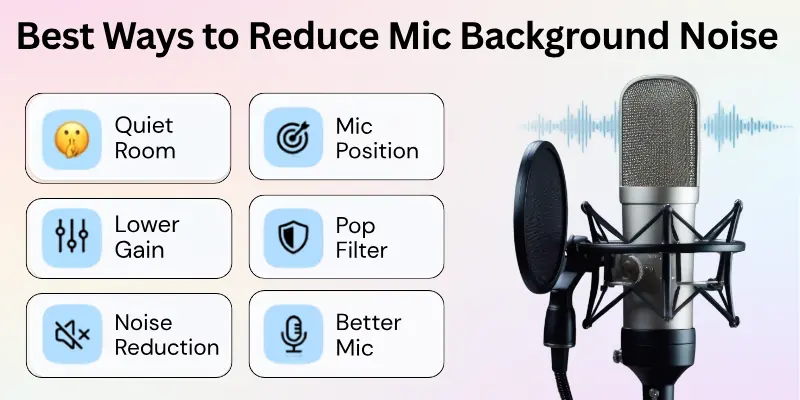
Below are the best ways to reduce mic background noise and get clear, clean audio:
1. Record in a Quiet Room
The easiest way to reduce mic background noise is to record in a quiet room. Every microphone picks up sounds around it. If your room is noisy, your microphone will capture those sounds along with your voice.
Before you start recording, look around your room for anything that makes noise. Turn off devices that you do not need and close your doors and windows.
For example, your microphone may pick up:
- Traffic outside
- People talking
- Dogs barking
- Ceiling fans
- Air conditioners
- TV sounds
- Computer fans
Even a small reduction in room noise can improve your recording quality.
2. Move the Microphone Closer to Your Mouth
Keep your microphone close to your mouth so it captures your voice more clearly than other sounds. A good distance is 6 to 12 inches (15 to 30 cm) from your mouth. This distance gives you clear audio while reducing background noise.
If the microphone is too far away, you may need to increase the gain. Higher gain makes the microphone pick up more unwanted sounds.
Do not place the microphone too close, or your breathing and popping sounds may become louder.

3. Lower Your Microphone Gain
Microphone gain controls how much sound your microphone hears. Think of it as your microphone’s listening power.
If the gain is too high, your microphone will hear almost everything in the room. It may record keyboard clicks, fan noise, or people talking nearby.
Lower the gain until your voice stays clear, but background sounds become quieter. You can test different levels by recording a short audio clip and listening to the results.
4. Turn Off Background Noise Sources
Many everyday devices create noise that you may not notice until you hear your recording. Before recording, turn off or move away from unnecessary noise sources.
Common examples include:
- Fan
- Air conditioner (AC)
- Television
- Air cooler
- Mobile phone notifications
- Washing machine
- Vacuum cleaner
- Loud computer speakers
The quieter your room is, the cleaner your microphone will sound.
5. Use a Pop Filter
A pop filter is a small screen that sits in front of your microphone. It reduces strong bursts of air when you say letters like P and B.
Without a pop filter, these sounds can create loud popping noises in your recording.
A pop filter also helps you keep a consistent distance from the microphone, which can improve your overall sound quality. It does not remove background noise directly, but it helps produce cleaner voice recordings.
6. Use a Foam Windscreen
A foam windscreen fits over the microphone and reduces unwanted air noise.
It works well indoors by reducing breathing sounds and light air movement. Outdoors, it helps reduce wind noise, although a thicker furry windscreen usually works better in strong wind.
Use a foam windscreen if you record:
- Videos
- Podcasts
- Voiceovers
- Outdoor interviews
- Mobile recordings
It is an affordable accessory that can improve your audio quality.
7. Use a Shock Mount
A shock mount holds your microphone with elastic bands or special supports. It prevents vibrations from reaching the microphone.
Without a shock mount, your microphone may record sounds caused by:
- Typing on your keyboard
- Bumping the desk
- Moving your mouse
- Tapping the table
If you use a desk-mounted microphone, a shock mount can make your recordings much cleaner.
8. Place the Microphone Correctly
Microphone placement affects both voice quality and background noise. A common mistake is pointing the microphone away from your mouth or placing it too far to the side. This forces you to increase the gain, which also increases unwanted noise.
For the best results:
- Point the microphone toward your mouth.
- Keep it 6 to 12 inches away.
- Place it slightly below or beside your mouth to reduce breathing sounds.
- Avoid placing it near speakers or noisy equipment.
Correct placement helps your microphone focus on your voice.
9. Choose the Right Microphone
Not every microphone works well in every environment. Choosing the right type can greatly reduce background noise.
USB Microphone: A USB microphone connects directly to your computer. It is simple to use and a good choice for beginners.
XLR Microphone: An XLR microphone connects through an audio interface or mixer. It usually provides better sound quality and more control for professional recording.
Dynamic Microphone: A dynamic microphone focuses mainly on nearby sounds. It rejects more background noise, making it a great choice for noisy rooms.
Condenser Microphone: A condenser microphone captures more detail. It works well in quiet rooms but also picks up more background noise.
If your room is noisy, a dynamic microphone is often the better option.
10. Enable Noise Suppression
Many computers, apps, and recording programs include built-in noise suppression.
This feature automatically reduces sounds such as:
- Fan noise
- Keyboard typing
- Air conditioner noise
- Light background conversations
You can often enable noise suppression in:
- Video meeting apps
- Voice chat apps
- Streaming software
- Operating system settings
Turn it on and test your microphone to see if your voice still sounds natural.

11. Adjust Input Sensitivity
Input sensitivity controls how easily your microphone detects sound. If the sensitivity is too high, your microphone will capture more background noise. Lowering it slightly can improve voice clarity.
On Windows
- Open Settings.
- Go to System > Sound.
- Select your microphone.
- Adjust the input volume until your voice is clear.
On Mac
- Open System Settings.
- Select Sound.
- Choose Input.
- Select your microphone.
- Adjust the input level while testing your voice.
Always record a short sample after making changes.
12. Reduce Room Echo
Hard surfaces reflect sound and create echo. Echo makes your voice sound distant and less clear. You can reduce echo with simple household items.
Try using:
- Thick curtains
- Carpet or rugs
- Pillows
- Blankets
- Cushions
- Soft furniture
These materials absorb sound instead of reflecting it. Even placing a blanket behind your recording area can improve audio quality.
13. Use Noise Reduction Software
Noise reduction software can remove unwanted sounds during recording or after recording. Popular options include:
- Audacity for free audio editing
- OBS Studio for streaming and recording
- Krisp for real-time noise cancellation
- Adobe Audition for advanced audio editing
- NVIDIA Broadcast for AI-powered noise removal on supported NVIDIA graphics cards
Most of these tools allow you to test different settings until your voice sounds clear.
14. Remove Noise After Recording
Sometimes you cannot avoid background noise while recording. In that case, you can clean your audio afterwards. This process is called post-processing. Audio editing software can reduce humming, hissing, fan noise, and other unwanted sounds.
When using noise reduction tools, avoid removing too much noise. Heavy processing can make your voice sound unnatural or robotic.
Always listen to the final recording before publishing it.
15. Upgrade Your Recording Equipment
If you have tried every method and your audio still sounds poor, it may be time to upgrade your equipment.
Consider buying better recording gear if:
- Your microphone always produces hiss or static.
- Your microphone cannot capture clear speech.
- You record content regularly.
- You stream, create videos, or host a podcast.
Useful upgrades include:
- A better microphone
- A quality audio interface
- A boom arm
- A shock mount
- A pop filter
- A foam windscreen
You do not need the most expensive equipment. Even a few well-chosen upgrades can greatly improve your microphone’s sound quality.
How to Reduce Mic Background Noise on Windows
Windows includes several microphone settings that can help reduce background noise. You can improve your audio by adjusting the input volume and turning on noise suppression if your device supports it.
Follow these simple steps:
- Press Windows + I to open Settings.
- Click System.
- Select Sound.
- Under Input, choose your microphone.
- Lower the Input Volume if your microphone picks up too much background noise.
- Turn on Noise Suppression or Audio Enhancements if these options are available.
- Speak into your microphone and test the sound.
You can also:
- Move closer to your microphone.
- Turn off fans or TVs before recording.
- Use headphones to prevent speaker echo.
- Restart your computer after changing settings if needed.
These small changes can make your voice much clearer during calls, recordings, and live streams.
How to Remove Microphone Background Noise on Mac
Mac computers also provide built-in settings to improve microphone quality. You can adjust the input level and reduce unwanted sounds with a few simple steps.
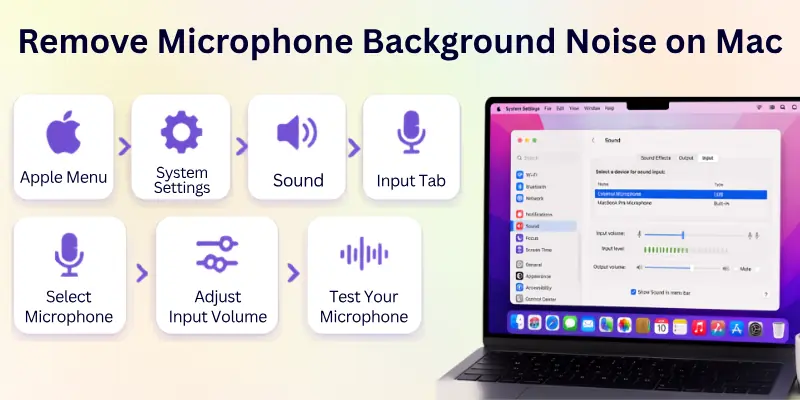
Here’s how:
- Click the Apple menu.
- Open System Settings.
- Select Sound.
- Click the Input tab.
- Choose the microphone you want to use.
- Adjust the Input Volume until your voice sounds clear without picking up too much background noise.
- Test your microphone by speaking normally.
For even better results:
- Record in a quiet room.
- Keep the microphone about 6 to 12 inches from your mouth.
- Use an external microphone instead of the built-in one if possible.
- Close apps that may also be using the microphone.
These steps can improve audio quality for video calls, voice recordings, and online meetings.
How to Remove Mic Background Noise on Android
Most Android phones use built-in microphones that can capture nearby sounds. While some phones include noise reduction features, you can also improve audio by changing your recording environment.
Try these tips:
- Record in a quiet room.
- Move away from traffic, fans, and televisions.
- Hold the phone close to your mouth.
- Keep your finger away from the microphone opening.
- Turn on Noise Reduction if your phone offers this feature.
- Use an external microphone for better sound quality.
- Update your recording app to the latest version.
Many recording and meeting apps also include their own noise reduction settings. Check the app’s audio settings before you start recording.
These simple steps can help you record clearer voice notes, videos, and online calls.
How to Reduce Microphone Background Noise on iPhone
iPhones are designed to produce clear audio, but they can still capture unwanted background noise in busy places. A few simple changes can improve your recordings.
Follow these tips:
- Record in a quiet location whenever possible.
- Hold the iPhone close to your mouth.
- Remove any phone case that blocks the microphone.
- Clean the microphone openings if they contain dust or dirt.
- Use wired or wireless earbuds with a built-in microphone for clearer voice capture.
- Connect an external microphone when recording videos or podcasts.
If you use apps like Zoom, Teams, or voice recorders, check their audio settings for built-in noise suppression or voice isolation features.
Testing your audio before an important meeting or recording helps you catch problems early and ensures your voice sounds clear.
Best Software to Remove Background Noise
Noise reduction software can remove unwanted sounds and make your voice clearer. Some tools work during live calls, while others clean up audio after recording:
| Software | Free or Paid | Best For |
| Audacity | Free | Audio editing |
| OBS Studio | Free | Streaming and recording |
| Krisp | Free & Paid | Online meetings |
| Adobe Audition | Paid | Professional editing |
| NVIDIA Broadcast | Free | Gaming and live streaming |
Which One Should You Choose?
- Audacity is the best free choice for beginners.
- OBS Studio is great for streamers.
- Krisp is ideal for video calls.
- Adobe Audition is best for advanced editing.
- NVIDIA Broadcast is perfect for gamers with supported NVIDIA GPUs.
Conclusion
This guide shows that learning how to reduce microphone noise is not hard if you pay attention to your setup. I personally recommend starting with a quiet space and stable microphone placement, then adding noise filters or free software tools if needed.
Managing noise becomes easier when you test your setup before recording and make small adjustments. I hope you find these suggestions helpful, and I wish you clear, professional-sounding audio in all your recordings.
Even after following the tips, some details can be confusing. The FAQs section clears up the most common doubts.
FAQs
Check these frequently asked questions to make sure your microphone sounds perfect every time:
The best microphone for background noise is usually a directional or cardioid mic, which focuses on your voice and blocks sounds from other directions. Condenser microphones can also work if you are in a quiet room. Choosing the right mic reduces unwanted microphone ambient noise before you even record.
Microphone ambient noise comes from surrounding sounds like fans, traffic, or keyboards. To fix it, record in a quieter room, use soft materials to absorb sound, and apply noise filters in software. Small changes to your setup can reduce most background sounds.
A noise filter microphone helps block unwanted background sounds during live calls or recordings. Make sure it is positioned correctly and paired with software that allows noise suppression. Combining physical filters with digital tools gives the best results.
A noise-cancelling microphone reduces unwanted background sounds automatically. It is ideal for home offices, streaming, or podcasting. While not always cheap, it saves time and improves audio clarity without a complex setup.
If you wonder why your mic is quiet on PC, it may be due to low input gain or muted system settings. Check the microphone settings in Windows or apps like Microsoft Teams’ mic settings to boost your voice level. Adjusting these ensures your microphone captures sound clearly.
To remove BG noise, you can use free background noise removal tools like Audacity or Ocenaudio. These programs let you clean fan sounds, keyboard clicks, and room echo without paying. For more advanced results, AI audio noise reduction or AI noise reduction software can further improve audio quality.



- Be Respectful
- Stay Relevant
- Stay Positive
- True Feedback
- Encourage Discussion
- Avoid Spamming
- No Fake News
- Don't Copy-Paste
- No Personal Attacks
- Be Respectful
- Stay Relevant
- Stay Positive
- True Feedback
- Encourage Discussion
- Avoid Spamming
- No Fake News
- Don't Copy-Paste
- No Personal Attacks