How to Connect a Camera to a TV – Complete Step‑by‑Step Guide in 2026
Connecting a camera to a TV means linking your camera with your television so you can see photos or videos on a bigger screen. Instead of looking at a small camera screen, you can enjoy a clear and large view on your TV.
This is useful when you want to watch recorded videos, view live camera footage, or show photos to family and friends. The TV gives a better and more comfortable viewing experience.
Different cameras need different methods to connect. Some cameras use HDMI cables, some use AV cables, and some connect through USB or wireless options. The right method depends on the type of camera and the ports available on your TV.
In this guide, we will explain how to connect a camera to a TV in easy steps. We will show each method with clear instructions. After reading this, you can connect your camera to a TV without worry.
What You Need Before Connecting Your Camera to TV
Before you start connecting your camera to your TV, make sure you have the right tools ready. This will help you avoid problems and complete the setup easily.
- A compatible camera (security camera, DSLR, or webcam)
- A TV with working input ports like HDMI, USB, or AV
- The correct cable (HDMI cable, AV cable, or USB cable)
- A stable power source for the camera
- A remote control to change TV input settings
- Optional: adapters or converters if ports do not match
Having these items ready makes the connection process smooth and fast.

How to Connect Camera to TV (Main Methods)
You can connect your camera to a TV in different ways. The method depends on the type of camera and the ports available on your TV.
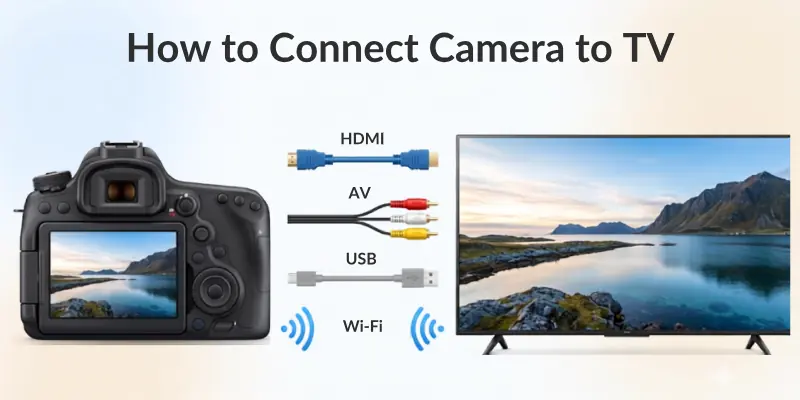
Below are the main and easy methods you can use:
Method 1: Connect Using HDMI Cable
- Take an HDMI cable
- Plug one end into the camera
- Plug the other end into the TV HDMI port
- Turn on both devices
- Press the “Input” or “Source” button on the TV
- Select HDMI mode
- Your camera screen will now appear on the TV
Method 2: Connect Using AV (RCA) Cables
- Take red, white, and yellow AV cables
- Match each cable with the correct colour port
- Connect the cables to the camera and TV
- Turn on both devices
- Switch the TV to AV mode
- You will see the camera display on the screen
Method 3: Connect Using a USB Cable
- Connect the USB cable from the camera to the TV
- Turn on the camera
- Open the TV media or USB mode
- Choose photos or videos from the camera
- Play or view files on the TV
Method 4: Connect Wirelessly (Wi-Fi or Screen Mirroring)
- Turn on Wi-Fi on your camera (if supported)
- Connect the camera and TV to the same Wi-Fi network
- Open screen mirroring or casting option on TV
- Select your camera from the device list
- Start viewing your camera on the TV screen
How to Connect a Security Camera to TV Without DVR
You can connect a security camera to a TV without using a DVR if your camera supports direct video output. You only need the right cable or adapter to make the connection.
- First, check the camera output type (BNC, HDMI, or RCA)
- If your camera has an HDMI port, connect it directly to the TV using an HDMI cable
- If your camera uses BNC output, use a BNC to HDMI converter
- Connect the converter to the TV HDMI port
- Turn on the camera and TV
- Press the “Input” or “Source” button on the TV
- Select the correct HDMI input
- The live camera feed will appear on the TV screen
If your camera uses RCA cables, you can also connect red, white, and yellow cables directly to the TV AV ports. Then switch the TV to AV mode to view the video. Make sure the camera has a power supply because it will not work without power.
How to Connect DSLR Camera to TV
You can connect a DSLR camera to a TV to view photos and videos on a larger screen. The most common method uses an HDMI cable.
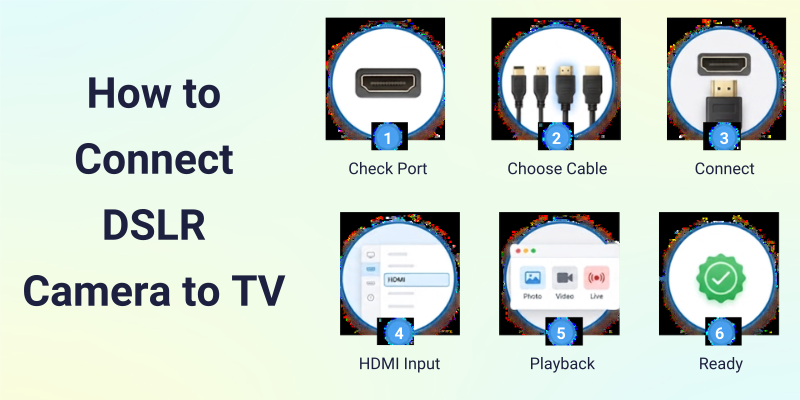
- First, check if your DSLR has a mini HDMI or micro HDMI port
- Get the correct HDMI cable for your camera type
- Turn off both the camera and TV before connecting
- Connect one end of the HDMI cable to the DSLR
- Connect the other end to the TV HDMI port
- Turn on the TV and select the correct HDMI input
- Turn on the DSLR camera
- Switch the camera to live view or playback mode
Your camera screen will now appear on the TV. You can view photos, play videos, or show live recording easily.
If the display does not show, check the cable connection and make sure the correct HDMI input is selected on the TV.

How to Select the Correct Input on TV
To see your camera display on the TV, you must choose the correct input source. This tells the TV where to get the video signal from.
- Turn on your TV and camera
- Press the “Input”, “Source”, or “AV” button on your TV remote
- A list of input options will appear on the screen
- Select the port you used, such as HDMI, AV, or USB
- Wait a few seconds for the signal to load
- Your camera screen will now appear on the TV
If nothing shows on the screen, go back and try a different input option. Also, check if the cable is properly connected.
Common Problems and Fixes
Sometimes the camera does not work properly when you connect it to the TV. Most issues are simple and easy to fix.
Here are the common problems and their solutions:
- No signal on TV: Check the cable connection. Make sure you selected the correct input, like HDMI, AV, or USB. Restart both devices if needed.
- Black or blank screen: Make sure the camera is turned on. Check if the cable is fully plugged in. Try another port on the TV.
- Poor or blurry video quality: Use a good quality HDMI cable. Clean the camera lens. Set camera resolution to high quality.
- No sound on TV: Check audio settings on the camera. Make sure TV volume is not muted. Try a different cable if needed.
- TV does not detect camera: Restart both devices. Check compatibility between camera and TV. Try another connection method like HDMI or AV.
- Image freezes or lags: Close other apps or devices using the same connection. Use a shorter and better cable. Make sure the camera has stable power.
Conclusion
Now you know how to connect digital camera to TV in a simple and easy way. You can use HDMI, AV, USB, or wireless options depending on your device. Each method helps you view your camera on a bigger and clearer screen without any confusion.
I recommend using an HDMI connection if your device supports it because it gives the best picture and sound quality. If you have an older camera or TV, AV cables will still work well. Choose the method that matches your device for the best results.
If you have any questions or run into any issues with connecting a video camera to a TV, feel free to ask in the comments. I am always here to help you.
Important FAQs
Here are the most common questions and answers related to how to hook up camera to tv to help beginners get started quickly:
Most modern cameras can connect to a TV if they have HDMI or AV ports. These ports send video signals directly to the TV. If your camera only has a USB port, you may only view saved photos and videos, not live video. Always check your camera ports and TV inputs before choosing a cable.
The easiest method is using an HDMI cable. It gives both video and sound in high quality. Just connect one end to the camera and the other to the TV, then select the correct HDMI input on the TV. It works quickly and needs no extra setup.
Yes, you can use wireless options if your devices support them.
- Use screen mirroring on a smart TV
- Use Chromecast or AirPlay
- Connect both devices to the same Wi-Fi
- Select your camera or device from the list
This method removes the need for cables.
“No Signal” usually means the TV is not receiving the correct input. This can happen if the wrong HDMI or AV source is selected. It can also happen if the cable is loose or the camera is not turned on. Check connections and select the correct input source again.
Yes, most DSLR cameras support live view on a TV.
- Connect using an HDMI cable
- Turn on live view mode on the camera
- Select HDMI input on the TV
You will see real-time video on the screen, which is useful for filming or presentations.
You can use USB in some cases, but it has limits.
- Works best for photos and saved videos
- Does not usually support live video
- Some TVs may not read all file formats
Check your TV manual for supported formats.
Security cameras can connect in different ways:
- Use a BNC to HDMI converter for modern TVs
- Use AV cables for older TVs
- Connect the power supply to keep the camera running
- Select the correct HDMI or AV input on the TV
This setup helps you view live CCTV footage easily.
Before worrying, check a few basic things:
- Cable is properly connected
- Correct TV input is selected
- Camera is powered on
- Ports are compatible
- Try another cable or port
These simple checks solve most connection problems quickly.


- Be Respectful
- Stay Relevant
- Stay Positive
- True Feedback
- Encourage Discussion
- Avoid Spamming
- No Fake News
- Don't Copy-Paste
- No Personal Attacks
- Be Respectful
- Stay Relevant
- Stay Positive
- True Feedback
- Encourage Discussion
- Avoid Spamming
- No Fake News
- Don't Copy-Paste
- No Personal Attacks