How to Clean a Computer Keyboard – Smart Hacks and Pro Tips
A clean keyboard helps you work faster and type with ease. Over time, dust, food crumbs, and germs build up between the keys. This can slow down your typing and make keys feel sticky or unresponsive.
Many people ignore keyboard cleaning, but it directly affects comfort and performance. A dirty keyboard can also carry bacteria that spread with daily use.
In this guide, I will show you how to clean a computer keyboard in a simple and safe way. You will learn why cleaning matters, how dirt affects performance, and what easy steps you can follow to keep your keyboard clean and working smoothly.
Now, let’s see how to clean a laptop keyboard safely and remove dust, dirt, and debris without causing any damage.
Tools You Need to Clean a Keyboard
Before you start cleaning your keyboard, you should gather the right tools. Using proper tools makes the cleaning process safe, easy, and effective. It also helps you avoid damage to the keys and internal parts.
- Microfiber cloth: Used to wipe dust, fingerprints, and oil from the keyboard surface without scratching it.
- Soft brush: Helps remove dust and dirt from between the keys and small gaps.
- Compressed air: Blows out dust and crumbs from hard-to-reach areas under the keys.
- Cotton swabs: Useful for cleaning tight corners and edges around keys.
- Mild cleaning solution or isopropyl alcohol (70%): Helps disinfect and remove sticky dirt when used lightly on a cloth.
- Keycap puller (for mechanical keyboards): Helps safely remove keycaps for deep cleaning without damage.
How to Clean a Computer Keyboard Step by Step
Cleaning a keyboard is easy when you follow the right steps in order. Take your time and clean each part carefully for the best results.
Below are some ways to clean a keyboard:
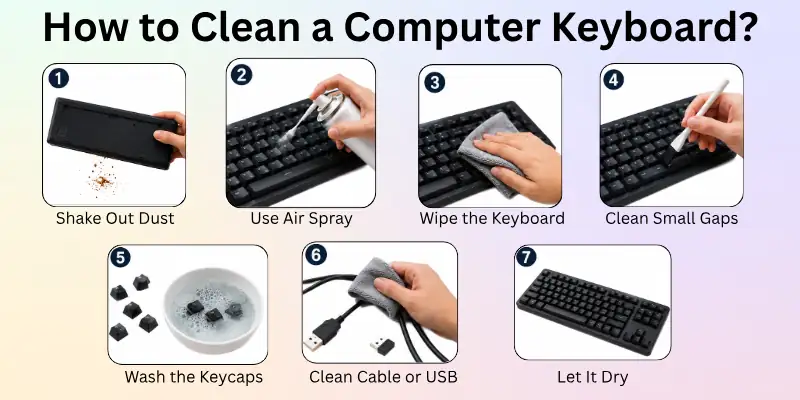
Step 1: Shake Out Loose Dust and Crumbs
Turn your keyboard upside down and gently shake it. This helps remove loose dust, crumbs, and dirt stuck between the keys. Do it over a trash bin or a clean surface. Do not shake too hard to avoid damage.
Step 2: Use Compressed Air Between Keys
Use compressed air to clean between the keys. Hold the can at a slight angle and spray short bursts. This removes dust that shaking cannot reach. Move across all key rows slowly for better cleaning.
Step 3: Clean Keyboard Surface
Use a soft microfiber cloth to clean the top surface. Wipe gently to remove fingerprints, oil, and dust. If needed, slightly dampen the cloth, but do not make it wet.
Step 4: Clean Around and Under Keys
Use a soft brush or cotton swab to clean tight spaces around the keys. This helps remove dirt stuck in small gaps. Be gentle so you do not push dirt deeper inside.
Step 5: Deep Clean Keycaps (if removable)
If your keyboard allows key removal, take off the keycaps carefully. Clean them with warm water and mild soap. Let them dry completely before putting them back.
Step 6: Clean Cable or Wireless Receiver
Wipe the cable with a dry cloth if you have a wired keyboard. For wireless keyboards, gently clean the USB receiver. This helps keep your connection stable and dust-free.
Step 7: Let It Dry and Reconnect
Before using your keyboard again, make sure everything is completely dry. Reconnect it to your computer only when there is no moisture left. This step protects your keyboard from damage and ensures safe use.

How to Deep Clean a Keyboard (Advanced Cleaning)
A deep clean helps remove hidden dirt that normal cleaning cannot reach. You should do this when your keyboard feels very dirty, sticky, or stops working well.
Take your time and follow each step carefully:
Remove Keycaps Safely
Use a keycap puller if you have a mechanical keyboard. Gently remove each keycap one by one. Place them in a safe bowl or tray so you do not lose them. Be slow and careful to avoid breaking the switches.
Clean the Keycaps
Wash the removed keycaps in warm water with a small amount of mild soap. Rub them gently with your hands or a soft brush. This removes oil, dust, and stains. After washing, rinse them well and let them dry fully on a towel.
Clean the Keyboard Base
Use a soft brush or compressed air to remove dust from the empty keyboard base. Focus on the spaces where keycaps were placed. Wipe the surface with a slightly damp microfiber cloth for better cleaning.
Clean Hard-to-Reach Areas
Use cotton swabs for small gaps and corners. This helps remove hidden dirt around switches and edges. Work slowly so you do not push dust deeper inside.
Dry Everything Completely
Let all parts dry fully before reassembling. Moisture can damage the keyboard if it gets trapped inside. Wait several hours if needed to make sure everything is completely dry.
Reassemble the Keyboard
Place each keycap back in its correct position. Press gently until they fit properly. Once done, reconnect your keyboard and test all keys to make sure everything works smoothly.
Cleaning Special Keyboard Types
Some keyboards have lights or rubber covers. You must specially clean them to keep them safe.
Backlit Keyboards
Backlit keyboards have tiny lights under the keys. You need to clean them gently so the lights do not get damaged.
- Blow: Use compressed air to blow out dust.
- Wipe: Use a cloth with a little water to clean the surface.
- Avoid: Do not use too much water near the lights.
- Check: Follow the maker’s guide for cleaning if possible.
Silicone or Rubber Keyboard Covers
These covers sit on top of your keyboard and help keep it clean. You should clean them often because they collect dust, dirt, and oil from your fingers.
- Remove: Take the cover off the keyboard.
- Wash: Clean it with warm, soapy water.
- Rinse: Rinse the cover well with clean water.
- Dry: Allow the cover to dry fully in the air before using it again.
If you take care of special keyboards gently, they will stay clean and safe for a long time.
When Should You Replace Your Keyboard?
Sometimes, cleaning is not enough to fix keyboard problems. If your keyboard shows serious damage or stops working properly, replacement becomes the better option.
You should not keep using a faulty keyboard because it can affect your typing speed and overall performance:
- Repeated key failure: If some keys stop working again and again even after cleaning, it means the internal switches are worn out or damaged.
- Severe internal damage: If the keyboard has broken circuits or hardware issues, it will not perform correctly. In this case, repair is often not effective.
- Liquid damage beyond repair: If water or any liquid enters deep inside the keyboard and causes permanent issues, replacing it is usually the safest choice.

Conclusion
We’ve reached the end, and by now, you know exactly how to clean a keyboard from top to bottom.
Personally, I recommend making keyboard cleaning a monthly habit, especially if you eat or work at your desk often. A clean keyboard not only looks better but also lasts longer. Try these tips today and keep your setup fresh and working smoothly.
You’ll be surprised how much better it feels to type on clean keys. Don’t wait, give your keyboard a quick clean now and enjoy the difference!
Common FAQs
Below are some common questions about how to clean keyboard properly:
You can clean a keyboard without removing the keys by using compressed air, a soft brush, and a microfiber cloth. Start by turning the keyboard upside down to remove loose crumbs and dust. Then use compressed air between the keys and wipe the surface gently.
This method works well for regular cleaning and helps keep your keyboard in good condition.
Yes, you can use isopropyl alcohol (70%) to clean your keyboard. Apply it to a microfiber cloth rather than directly onto the keyboard. Alcohol helps remove oil, dirt, and germs while drying quickly. Avoid using excessive amounts to prevent moisture from reaching internal components.
Yes, compressed air is generally safe when used correctly.
- Hold the can upright while using it
- Use short bursts instead of continuous spraying
- Keep a small distance from the keyboard
- Move across the keys slowly for even cleaning
It is one of the best tools for removing dust and crumbs from hard-to-reach areas.
Sticky keys usually happen because of dust, food particles, or spilt drinks. Start by cleaning around the affected keys with a cotton swab and isopropyl alcohol. If the problem remains, remove the keycaps if your keyboard allows it and clean underneath them carefully.
Regular cleaning can prevent keys from becoming sticky again and improve your typing experience.
Yes, water can damage a keyboard if it enters the internal components. Even small amounts of liquid can cause keys to stop working or create electrical issues.
If you accidentally spill water on your keyboard, disconnect it immediately and allow it to dry completely before using it again. Acting quickly can reduce the risk of permanent damage.
The cleaning schedule depends on how often you use your keyboard.
- Light cleaning: once a week
- Surface cleaning: every 2 to 4 weeks
- Deep cleaning: every 2 to 3 months
- Heavy users: clean more frequently
Regular maintenance helps keep your keyboard clean and responsive.
Yes, you can wash removable keycaps. Place them in warm water mixed with a small amount of mild soap. Let them soak for a short time, then rinse and dry them thoroughly before reinstalling them.
Never wash keycaps while they are attached to the keyboard. Also, make sure they are completely dry before putting them back.
Avoiding common mistakes can help protect your keyboard from damage.
- Do not use too much water
- Do not spray liquid directly onto the keyboard
- Do not use harsh chemicals or bleach
- Do not reconnect the keyboard before it is dry
- Do not use sharp objects to remove dirt
Using the right cleaning methods will keep your keyboard safe and working properly.
Laptop keyboards require extra care because they are built into the device. Turn off the laptop first and use compressed air to remove dust from between the keys. Wipe the surface with a microfiber cloth and use a cotton swab for tight spaces.
Avoid excessive moisture because liquid can reach internal laptop components and cause serious damage.
Yes, cleaning can improve keyboard performance, especially if dust and debris are affecting the keys. Dirty keyboards may have slow, sticky, or unresponsive keys that make typing difficult.
A clean keyboard allows keys to move freely and respond correctly. Regular cleaning also helps extend the lifespan of your keyboard and provides a more comfortable typing experience.


- Be Respectful
- Stay Relevant
- Stay Positive
- True Feedback
- Encourage Discussion
- Avoid Spamming
- No Fake News
- Don't Copy-Paste
- No Personal Attacks
- Be Respectful
- Stay Relevant
- Stay Positive
- True Feedback
- Encourage Discussion
- Avoid Spamming
- No Fake News
- Don't Copy-Paste
- No Personal Attacks