How to Clean Speakers – Keep Your Audio Crisp and Clear in 2026
Speakers collect dust, dirt, and small particles over time. This buildup can affect their appearance and may even reduce sound quality. Regular cleaning helps keep your speakers looking good and performing at their best.
Many people focus on cleaning screens, keyboards, and other devices, but often forget about their speakers. Dust can settle on speaker grilles, cones, and ports, which may block sound and make audio less clear. A simple cleaning routine can help prevent these issues and extend the life of your speakers.
In this guide, we will show you how to clean speakers safely and effectively. You will learn what tools to use, the steps to follow, common mistakes to avoid, and helpful tips to keep your speakers clean for longer.
Why Your Speakers Need Regular Cleaning
Speakers naturally collect dust, dirt, and fingerprints, especially on grilles, drivers, and tweeters. This buildup can reduce sound clarity, muffle audio, and even damage delicate components over time.
Regular cleaning helps your speakers perform at their best and extends their lifespan. By keeping them free of dust and grime, you ensure crisp, clear sound and maintain both the appearance and function of your devices.
Things You Need Before Cleaning Speakers
Before you start cleaning your speakers, gather the right tools. Using safe cleaning supplies helps remove dust and dirt without damaging sensitive speaker parts.
Here are the items you may need:
- Microfiber cloth to wipe away dust and fingerprints
- Soft-bristle brush to clean speaker grilles and hard-to-reach areas
- Compressed air to remove dust from small openings and ports
- Cotton swabs for cleaning corners and narrow spaces
- Mild cleaning solution for cleaning the outer surface when needed
- Lint roller for removing dust from fabric speaker grilles
It is also important to avoid tools that can damage your speakers. Do not use abrasive brushes, paper towels, sharp objects, or large amounts of water. These items can scratch surfaces or harm delicate speaker components.

Important Safety Steps Before You Start
Taking a few safety precautions before cleaning your speakers can help prevent damage and make the process safer and more effective.
- Turn off the speakers to avoid accidental damage while cleaning.
- Unplug power and cables before you touch any speaker components.
- Work in a dry, dust-free area to keep additional dirt and moisture away from the speakers.
How to Clean Speakers Step by Step
Now that you have your cleaning tools ready and have taken the necessary safety precautions, you can begin cleaning your speakers.
Follow these simple steps to remove dust and dirt without damaging any sensitive parts.
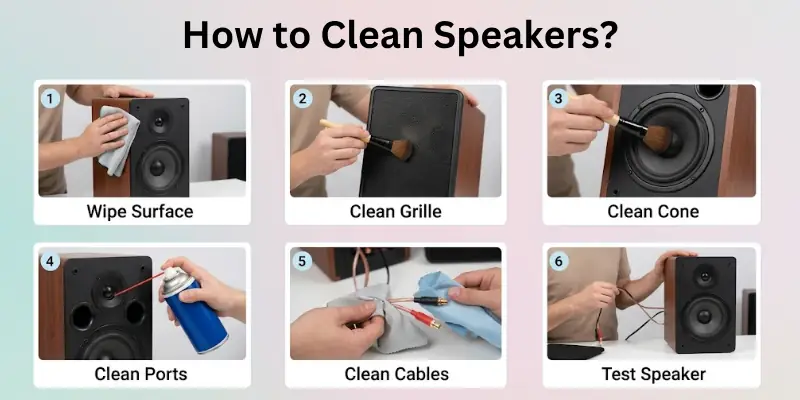
Step 1: Remove Dust From the Speaker Surface
Start by wiping the outside of the speaker with a clean microfiber cloth. Remove any loose dust, fingerprints, and dirt from the cabinet, sides, and top surface. For corners and small gaps, use a soft brush to loosen trapped dust.
Step 2: Clean the Speaker Grilles
Speaker grilles often collect the most dust. If the grille is removable, take it off carefully and clean it with a soft brush or lint roller. For fixed grilles, gently brush away dust or use compressed air to clear debris from the mesh.
Step 3: Clean the Speaker Cones Carefully
The speaker cone is delicate, so handle it with care. Use a soft brush to remove dust from the cone surface. Avoid pressing on the cone or using liquid cleaners, as this can cause damage and affect sound quality.
Step 4: Remove Dust From Speaker Ports and Openings
Use compressed air or a soft brush to clean bass ports, vents, and other openings. Hold the air can at a safe distance and use short bursts to remove dust without forcing debris deeper inside the speaker.
Step 5: Clean Speaker Cables and Connections
Wipe cables with a dry microfiber cloth to remove dust and dirt. Check the connectors and terminals for buildup, and gently clean them with a cotton swab if needed. Clean connections help maintain reliable audio performance.
Step 6: Reassemble and Test the Speakers
Once everything is clean and dry, reattach the speaker grilles and reconnect all cables. Turn on the speakers and play audio to make sure they are working properly and delivering clear sound.
Common Speaker Cleaning Mistakes to Avoid
Cleaning speakers is simple, but a few common mistakes can cause damage. Avoid these errors to keep your speakers safe and working properly.
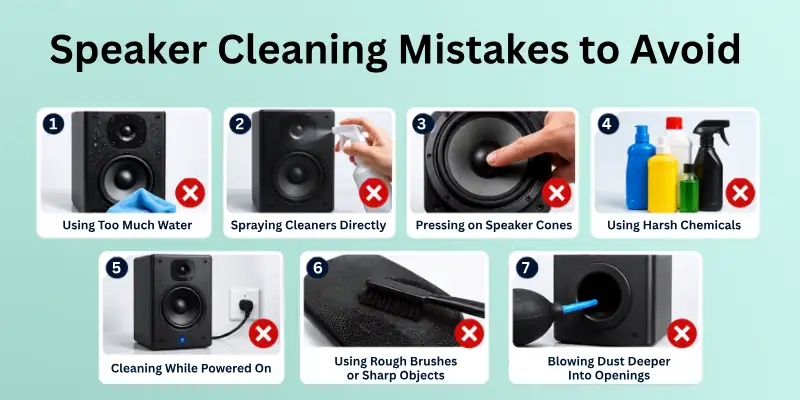
- Using too much water can damage internal components and affect performance.
- Spraying cleaners directly on speakers may allow liquid to enter sensitive areas.
- Pressing on speaker cones can dent or tear these delicate parts.
- Using harsh chemicals may damage finishes, grilles, or speaker materials.
- Cleaning while the speakers are powered on increases the risk of damage.
- Using rough brushes or sharp objects can scratch surfaces and harm speaker components.
- Blowing dust deeper into openings can make cleaning less effective and create future issues.
Taking a gentle approach and using the right tools will help you clean your speakers safely and maintain their sound quality.
How Often Should You Clean Your Speakers?
The ideal cleaning schedule depends on where and how often you use your speakers. Regular cleaning helps prevent dust buildup and keeps sound quality at its best:
- Dust the speaker surface once a week to prevent dirt from accumulating.
- Clean speaker grilles and openings once a month to remove trapped dust.
- Perform a deeper cleaning every three to six months for thorough maintenance.
- Clean more frequently if your speakers are in dusty environments or are used daily.
A simple cleaning routine can help extend the life of your speakers and keep them performing well for years.
When Should You Get Professional Speaker Cleaning?
Most speakers can be cleaned at home, but some situations require professional help. If you notice any of the following issues, it may be best to consult a technician:
- Water has entered the speaker and affected its performance.
- Dust or debris is trapped inside areas you cannot safely reach.
- Sound quality remains poor after cleaning the speaker properly.
- The speaker cone, grille, or internal parts are damaged.
- You hear crackling, buzzing, or distorted audio during playback.
- The speaker is expensive or vintage and requires special care.
Professional cleaning can help prevent further damage and ensure your speakers continue to perform at their best.

Conclusion
Today, we covered everything you need to know about how to clean computer speakers safely and effectively. We discussed the tools required for cleaning, important safety precautions, step-by-step cleaning methods, common mistakes to avoid, proper cleaning frequency, and situations where professional cleaning may be necessary.
Keeping your speakers clean does more than improve their appearance. It also helps maintain sound quality and can extend the life of your audio equipment. Regular maintenance prevents dust and dirt from building up on important speaker components.
We recommend adding speaker cleaning to your regular device care routine. Spending a few minutes cleaning your speakers every month can help keep them looking great and delivering clear, high-quality sound for years to come.
Common FAQs
Here are some common questions about how to clean speaker grills, with simple answers to help you clean safely, prevent damage, and keep your sound crisp:
The safest way to clean speakers is to use a microfiber cloth, a soft brush, or compressed air. Always turn off and unplug the speakers before cleaning. Gently remove dust from the surface, grilles, and openings without applying pressure. Avoid using excessive moisture or harsh cleaning products to prevent damage.
You can use a small amount of isopropyl alcohol to clean the outer surface of speakers if needed. Apply it to a microfiber cloth rather than directly onto the speaker. Keep alcohol away from speaker cones, mesh, and internal components, as it may damage delicate materials.
Yes, compressed air is generally safe for speakers when used correctly. It can help remove dust from grilles, ports, and other hard-to-reach areas.
Keep these tips in mind:
- Use short bursts instead of continuous spraying.
- Hold the can at a safe distance from the speaker.
- Avoid tilting the can during use.
- Do not force air directly into sensitive components.
Speaker mesh can collect a lot of dust over time. Use a soft brush or a lint roller to remove loose dirt from the surface. If dust is trapped inside the mesh, use compressed air to clear it gently. Avoid scrubbing the mesh aggressively, as this can damage the material.
Yes, dirty speakers can affect sound quality. Dust and debris may block speaker grilles, ports, and other openings, making audio sound less clear. Over time, heavy dust buildup can reduce volume and affect overall performance. Regular cleaning helps maintain clear and consistent sound.
The frequency depends on your environment and usage habits.
For most users:
- Wipe away surface dust once a week.
- Clean grilles and ports once a month.
- Perform a deeper cleaning every three to six months.
- Clean more often if you live in a dusty area.
A vacuum can remove loose dust from speaker surfaces, but it should be used with caution. Strong suction may damage delicate speaker parts or pull on fabric grilles. In most cases, a soft brush, microfiber cloth, or compressed air is a safer option for routine cleaning.
To protect your speakers, avoid these common mistakes:
- Using too much water or liquid cleaners.
- Spraying products directly onto the speaker.
- Pressing on speaker cones.
- Using rough brushes or sharp tools.
- Cleaning while the speaker is plugged in.
Avoiding these mistakes can help prevent unnecessary damage.
Yes, water can damage speakers if it reaches internal components. Moisture may affect wiring, electronics, and speaker materials, leading to poor performance or permanent damage.
If you need to clean the outer surface, lightly dampen a microfiber cloth instead of applying water directly. Always make sure the speaker is completely dry before reconnecting it.
Bluetooth speakers do not usually require special cleaning methods, but they do need extra care around charging ports, buttons, and protective seals. Use a dry microfiber cloth to clean the exterior and a soft brush to remove dust from small openings.
If your Bluetooth speaker is water-resistant, do not assume it is safe to wash or soak it. Follow the cleaning instructions provided by the manufacturer to avoid accidental damage.


- Be Respectful
- Stay Relevant
- Stay Positive
- True Feedback
- Encourage Discussion
- Avoid Spamming
- No Fake News
- Don't Copy-Paste
- No Personal Attacks
- Be Respectful
- Stay Relevant
- Stay Positive
- True Feedback
- Encourage Discussion
- Avoid Spamming
- No Fake News
- Don't Copy-Paste
- No Personal Attacks